In order for a dynamic template set to produce proper layouts settings called "Sizing Rules" are assigned to each layer (element) in the template to control how that particular element shifts and scales in relation to other elements on the template and/or the document size itself. The template composer should understand how each of the sizing rules operate in order to select settings that will produce good layouts. Sizing rules are settings that will determine how a layer will change position (translate) and scale/re-size (transform) as the template grows (remember, dynamic templates only get larger, never smaller).
When a template is defined as dynamically sized in campaign settings, the "Sizing Rule" settings will become active within the template. Sizing rules can be set on ANY template, master or campaign, dynamic or not, but they will not have any effect unless they are in a dynamically sized template. We also cannot test sizing rules unless dynamic sizing is enabled for the campaign item, so it is best to wait until the template is in the campaign before assigning sizing rules. Once the rules are set, they do carry over into a master template or when cloned.
For both text and image layers, sizing rules are accessed by clicking the “Sizing Rules” button in the pop-up.

Default Sizing Rules
Depending on whether the layer is text or image, there will be slightly different options shown, however, there will always be options for translating the layer (moving it on the x and y axis) and transforming it (how it changes in size). The "zero" point for CampaignDrive template sizing rules is the upper left corner of the template. Objects will shift based on this point. The default sizing rules are:
For Images:
- Slide Proportionally
- Scale Proportionally (stretches)
For Text:
- Slide Proportionally
- Scale Proportionally (stretches)
- No Scale (for font size)
- Scale Proportionally (for font leading)
If no sizing rules are changed, these defaults are enabled for every text and image layer in the template. The rules mean that, as the template grows in width and height, the element will move down and to the right by a certain amount. This movement is in relation to how much the template dimensions are enlarged in either width or height. In addition, the size of the element will also grow in width and height by a certain amount. For text, this growth will apply to the size of the text box itself. By default, the font will NOT grow in size, but the distance between lines will.
Assigning Sizing Rules
To assign a sizing rule, first click in the Sizing Rules button to open the editor.
Text Editor:

Image Editor:

"Move layer on x,y axis": Movement controls
"Scale width and height of layer": Re-size controls
Options are accessed by clicking on the down arrow in the box. Depending on the option shown, additional fields will appear for additional controls.
Complete List of Sizing Rules
Options available for both text and image layers:
Translation Rules - Move Layer on X, Y axis:
- No Slide: Layer does not move
- Slide Proportionately: Moves layer to a new X,Y position proportional to the document’s resized dimensions (default setting)
- Slide Width Proportionately: Moves layer to a new X position, proportional to the document’s resized width (Y position will not change)
- Slide Height Proportionately: Moves layer to new Y position, proportional to the document’s resized height (X position does not change)
- Keep Margin With: Maintains the distance between a reference point (that you select) of the layer and the reference point (that you select) of another layer or element.
- Keep Alignment With: Aligns the selected reference point of the layer with the reference point of another layer or element.
The Slide options move the layer with respect to the upper left corner of the document page and this movement is independent of any other layer. The "Keep Margin With" or "Keep Alignment With" options adjust the layer in relation to another layer or document reference point. You will need to choose which element or layer to bind your current layer with and the reference point within that second element. The Bind To option will include all layers that currently exist in the document and elements that are standard to all documents (Media Box, Art Box, Trim Box and Bleed Box).
Transformation Rules - Change the dimensions of the layer:
- No Scale: Layer size does not change
- Scale Proportionately (stretches): Resizes layer to a new width and height proportional to the document’s resized height (default)
- Scale Width Proportionately: Resizes the layer’s width, proportional to the document’s resized width. The height will not change.
- Scale Height Proportionately: Resize the layer’s height, proportional to the document’s resized height. The width will not change.
- Scale Constraining Aspect: The layer will resize and keep the same aspect ratio (relevant height and width). Always use this setting for logos. This setting can be useful for text to preserve a headline appearance as the document grows. This setting will also preserve the relationship between font size and leading.
Image Layer-Specific Rules
- Scale Proportionately with Crop: Resizes the image, while maintaining the original aspect ratio and crops the image based on a set position. When choosing this option, you will need to set the crop position as a guide when auto-cropping the image. The crop position specifies where the crop originates FROM (Ex: Setting crop to “Top” means that the bottom of the image will be cropped).
Text Layer-Specific Rules
Text layers have additional settings that determine how the font and font leading grow as the template re-sizes. These settings are independent of the re-sizing of the layer box they reside in.
Translation Rule:
- Keep Margin With Proportionally: Maintains a proportional distance between a reference point (that you select) of the layer and the reference point (that you select) of another layer or element. This applies to the text box.
Transformation Options for Font Size: Defines how the font size should grow. These settings apply to the text itself, not the text box.
- No Scale: Font size does not change
- Scale Proportionately: Font size grows proportional to the resized layer that it resides in. If your layer’s transform is set to “No Scale” the font size will not change. This setting can cause the font size to grow faster than layer box re-size, so check this setting carefully in testing.
- Scale Constraining Aspect: Causes the font and leading to grow but maintains the relationship between the font size and leading.
Font Leading: Defines how the leading should grow:
- No Scale: Font leading does not change
- Scale Proportionately: Font leading grows proportional to the resized layer that it resides in. If the layer’s transform is set to “No Scale” the font leading will not change.
Tips for Working with Sizing Rules:
- Sizing rules are in effect even if no re-sizing takes place. In other words, if you have a sizing rule that would alter the position of an element (by aligning it with another object or centering it on the page when it wasn't initially), this re-positioning will happen at the default size.
- Any item that is an "image" layer type that should maintain aspect ratio (such as a logo or graphic), should be set to "No Scale" or "Scale Constraining Aspect"
- It is best practice to assign a sizing rule to every element on the page - don't leave anything as default - the default settings provide the least amount of control.
- "Keep Margin With" maintains the same distance between two objects or an object and the container.
- "Keep Alignment With" will force two objects to align together.
- When assigning relationships with text boxes, remember that the translation and scaling rules are applied to the text BOX, not the text itself.
- When testing a set of sizing rules on the front end, start by testing at the library size, with no re-sizing to check initial settings.
Example: "Keep Margin With"
In this example, the layer "Image Layer" is set to keep the top left corner of the image box the same distance away from the left corner of the document.
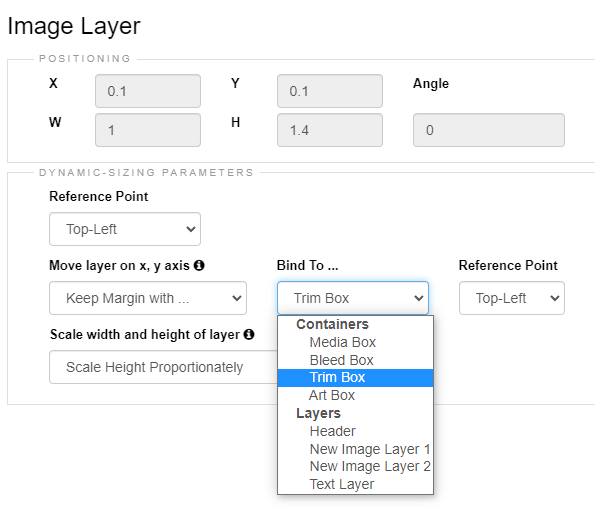
Reference Point: This is the reference point of the layer you are working with
Move layer on x-, y-axis: This is the translation selection chosen - in this case "Keep Margin with"
Bind To...: This is the object that you wish to have the object relate to. Note that the document container or ANY other layer in the template may be chosen.
Reference Point: This is the reference point of what you are binding to.
Pro Tip: Text can be resized dynamically by the system using sizing rules as described above or by using scalable type. As a best practice, the scalable type feature will not be used in a dynamic template where sizing rules are applied. The only time the scalable type feature would be used in a dynamic template is on a text box where no sizing rules have been applied.