Note that this article is more technical in nature and is geared towards a graphic designer or someone with a working knowledge of Photoshop and Illustrator.
This tutorial is based on the CC 2022 version of Illustrator and Photoshop.
Building the "BrewHouse Training Session" Animated GIF (shown above)
Building the Artwork
Building the animated GIF shown above started out with building out the artwork in Illustrator. This step could also be done in InDesign, Photoshop or a design program of your choice; the goal is to create static artwork that will be the base of the animated GIF. Below is a visual of the static artwork used for this specific use case.
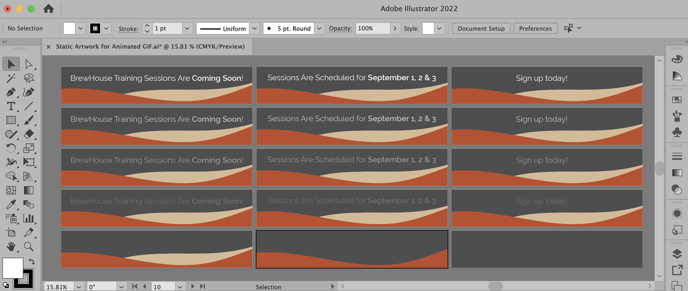
To create the fade in, fade out effect; the "key messaging artwork" was built out first (opacity at 100%) and then the faded artwork was created at 25% , 50% and 75% opacity. In the screenshot above, the first row represents the 100% opacity artwork; the second row represents 75% opacity; and so on.
The last row represents the intro/outgo artwork - there's no messaging, but the layers slowly add or disappear.
Once the artwork was finalized, each artboard was exported as an RGB 72 DPI JPEG.
Uploading the Artwork into Photoshop
Gather the images you want in a separate folder. To upload them into Photoshop, click File > Scripts > Load Files Into Stack.
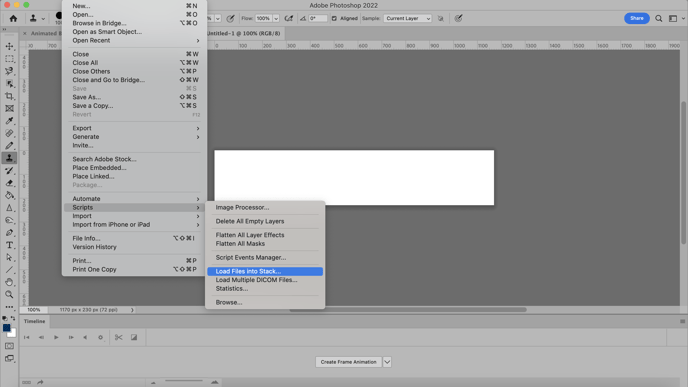
Then, select Browse, and choose which files you'd like to use in your GIF. Then, click OK.

Photoshop will then create a separate layer for each image you've selected.
Open up the Timeline window.
To open Timeline, go to the top navigation, choose Window > Timeline. The Timeline will let you turn different layers on and off for different periods of time, thereby turning your static image into a GIF.

The Timeline window will appear at the bottom of your screen. Here's what it looks like:

In the Timeline window, click "Create Frame Animation."
If it's not automatically selected, choose it from the dropdown menu -- but then be sure to actually click it, otherwise the frame animation options won't show up.

Now, your Timeline should look something like this:

Create a new layer for each new frame.
To do this, first select all your layers by going to the top navigation menu and choosing Select > All Layers.
Then, click the menu icon on the right of the Timeline screen.

From the dropdown menu that appears, choose Create new layer for each new frame.

Open the same menu icon on the right, and choose "Make Frames From Layers."
This will make each layer a frame of your GIF.

Once the layers have been added to the timeline, duplicate any layers for the transitions on either side of the key artwork (the 100% opacity artwork.)

The key artwork should have the 25%, 50% and 75% artwork appear before it for the "fade in effect", and the 75%, 50% and 25% after it for the "fade away effect."
You can use the duplicate and delete icons as needed to manage the number of layers and you can drag and drop layers into the correct position in the Timeline view.

Under each frame, select how long it should appear for before switching to the next frame.
To do this, click the time below each frame and choose how long you'd like it to appear. In the animated GIF featured above, the slides used to create the "animated" effect are set to .1 seconds, the "key visuals are on screen for two seconds for legibility and the last grey box is on screen for three seconds so that there's a pause between the GIF looping.

At the bottom of the toolbar, select how many times you'd like it to loop.
The default will say Once, but you can loop it as many times as you want, including Forever. Click Other if you'd like to specify a custom number of repetitions.

Preview your GIF by pressing the Play icon.

Save and Export Your GIF
Satisfied with your GIF? Save it to use online by going to the top navigation bar and clicking File > Export > Save for Web (Legacy)...

Next, choose the type of GIF file you'd like to save it as under the Preset dropdown. If you have a GIF with gradients, choose Dithered GIFs to prevent color banding. If your image employs a lot of solid colors, you may opt for no dither.
The number next to the GIF file determines how large (and how precise) the GIF colors will be compared to the original JPEGs or PNGs. According to Adobe, a higher dithering percentage translates to the appearance of more colors and detail -- but it increases the file size.

Click Save at the bottom to save the file to your computer. Now you're ready to upload this GIF to use in your CampaignDrive instance!