Guide to creating and sizing print and digital templates and adding text and image content.
When to Use Manual Installation
Manual template creation is used for layout-based templates in a number of cases:
- Simple print templates
- Digital templates
- If an InDesign file is not available
Manual Installation Steps
- Check to ensure all fonts and colors are installed - install if necessary
- Format all images based on their intended use
- Upload the images into the appropriate Asset Category
- Determine template type - print or digital
- Determine installation location - Master template or Campaign location
- Create a template at the correct size either as a Master template or from within a Campaign
- Place the images onto the template using image layers
- Create, position and populate text layers as appropriate
If you are re-creating a template in the system from an external source such as Photoshop or Illustrator, use the original file as a guide when placing images and placing and styling text.
Installation Locations
There are two places that layout-based templates may be manually added to the system. The first is as a Master Template on the “Layout Template Composition” page and the second is as a Campaign Item from within a Campaign.
Master Template
When adding as a Master Template, click the “+Add New” button and select the template type: “Print Master Template” or “Digital Master Template” from the drop-down menu that is displayed. After you have selected the template type, you will be presented with a pop-up form to enter the template information. The forms are slightly different for print and digital templates.

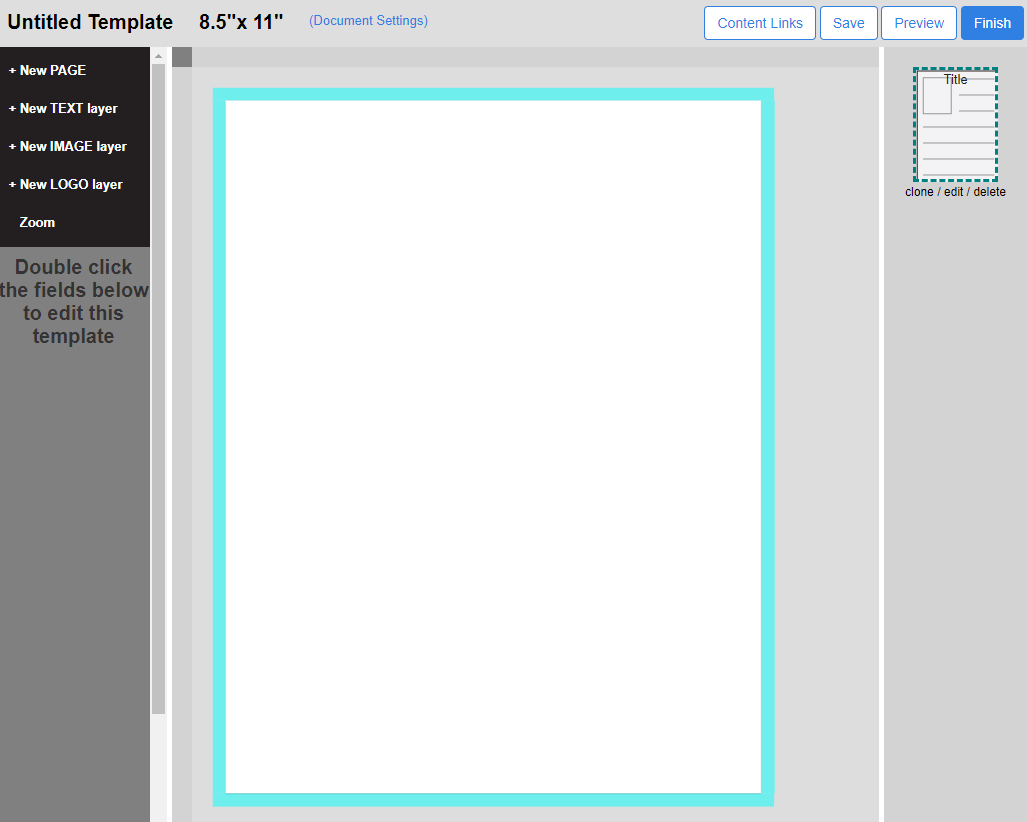
Print Templates:
For print templates, the default artboard will be 8.5” x 11” with a .125” bleed. From this screenshot you can see the template behind the pop-up. The bleed is indicated by the aqua line.

From this screen you can:
- Give the template a name
- Give the template a description
- Specify a default font (optional).
- Change the measurement type: in/mm
- Change the document width/height.
- Change or remove the bleed.
- Adjust the “Media” setting. Media is used only with bleeds and should be set slightly larger than the bleed measurement.
Make any necessary changes and click “OK” at the bottom of the page.
Digital Templates:

For digital templates the default artboard will be 300px x 250px and the only measurement available is pixels. Notice that bleed is not an option for this template type.
Campaign Templates
When adding a template manually as a Campaign Item, you will make the choice of either “Print” or “Digital” at the top of the Campaign Item form.

When presented with the list of Master Templates, choose “create new template” at the top of the list. When adding a template directly into a campaign, you will not be presented with the pop-up to edit the document settings. The template will generate using the defaults. You will need to open the template in the campaign and click on “Document Settings” to update the template name and dimensions.
Adding Content
 Once the template has been created, it is ready for content. There are two types of content that can be added to a template. This is true for any template, whether it is installed manually or uploaded via IDML or HTML import. These two types of content are text and images.
+ New TEXT layer - Add text by clicking the "+New TEXT layer" button.
+ New IMAGE layer - Add images by clicking the "+New IMAGE layer" button.
Adding a Text Layer
To add a new text layer, click the “+ NEW Text Layer” button in the left-hand menu. The text editor will open. Notice that a default size of 1” x 1” has been set for the layer, positioned at X=.1 Y=.1.

Adding Text
You may add text to the text editor in several different ways:
- Type text directly into the editor
- Copy and Paste text from an outside source
- Copy and Paste source code from another template in your system
- Add tags
You can have different styling applied to text within the same text box, for example, a headline and body paragraph underneath. Whether or not text should be in the same or separate text layers will depend on the layout of your template and the End User experience.
Adjusting the Text Box
The text box size may be set by typing into the text editor and this is the best way to precisely position the box. The box can also be adjusted by dragging on the corner handles. You can also drag and drop the box on the template to position it. If you are duplicating a layout from a program such as Photoshop or Illustrator, you can use the coordinates and width and height of the text layer in those programs to position the text layer.
Here is a sample of a text layer that has been styled:

Notice the name of the layer appears as a button on the left side of the page. The layer has been set at X=.25” and Y=.25” with a width of 2” and a height of 1”. A font, color and size has been applied to the text.
Clicking on the text will show the styling that has been applied: The font name appears in the font list, the font size appears in the font size list and the color of the text shows on the template and in the WYSIWYG:

Here is what the source code for this text looks like:

Here is an example of text with different styling in the same text layer:

Adding an Image Layer
To add a new image layer, click the “+ NEW Image Layer” button in the left-hand menu. The image editor will open. Notice that a default size of 1” x 1” has been set for the layer, positioned at X=.1 Y=.1.

Adding an Image
To add a new image to your template, click the “Select Asset” button and select your desired image. If your image is not yet on the system, you will need to upload it so that it will be available. Please click here for documentation on uploading images.
In the sample below, an image has been selected and applied to the template. It is important to note that the image is NOT applied at its original size. By default, an image is set on the template with a width of 1” and the height scaled to match the aspect ratio of the image. If the image needs to be at its original size, you will need to know the width or height and type it into the editor after the image has been selected.

Unlike a text layer, an image layer cannot change width or height independently. If one of these values changes, the other will change to maintain the correct aspect ratio of the image.
Additionally, you cannot specify the height and width of an image layer without first selecting an image. Therefore, if the layout requires an image of a certain size, a placeholder image MUST be made ahead of time and uploaded to the system to provide the correct aspect ratio for the image slot. Once this is done, content groups, content links or cropping may be applied to the text layer.
Here is our image layer sized to fit the width of our template:

Creating Layouts
To create a complete template add text and image layers as needed to create your layout. Each layer will have its own button on the left side of the page, named with the layer name. Remember that layers that are “Content Locked” will appear to you on the back end but will not appear to End Users on the front end.